Optimize Voice Recorder Settings for Clear Interview Audio
Learn how to optimize voice recorder settings for crystal-clear interview audio, from gain to bitrate, and start recording professional-quality audio. Read more
Optimize Voice Recorder Settings for Clear Interview Audio
Introduction
Optimize voice recorder settings to capture interview audio that sounds professional, even when you’re on a smartphone. Podcasters and interviewers who master a few technical tweaks can eliminate hiss, avoid clipping, and keep listeners focused on the conversation-not on distracting artifacts. This guide walks you through the exact adjustments, from microphone gain to file export, so every interview feels studio-grade without expensive gear.
Fine-tune microphone gain for interview clarity
The first step in optimizing voice recorder settings is setting the correct microphone gain. Gain determines how much electrical signal the mic converts into digital audio; too high and you’ll get distortion, too low and quiet speech will be lost in noise.
- Start with a low baseline - set the gain slider to about 30 % of its maximum.
- Do a spoken test - record a 10-second sentence at normal speaking volume.
- Watch the recording level meter - the peaks should consistently hit the yellow zone without touching red.
- Adjust incrementally - increase gain in 5 % steps until the meter reaches the target range.
- Re-test after each adjustment - ensure the same sentence still sounds clean.
Tip: When recording multiple speakers, ask each person to speak at the same distance from the mic; this keeps gain settings stable across the session.
If you notice occasional peaks (e.g., laughter or emphatic statements), consider enabling the noise reduction filter that many apps, including VoiceRecorder, provide. It smooths sudden spikes without sacrificing overall intelligibility.
Choose the right audio format and bitrate
Selecting the best audio bitrate for podcasts directly influences file size, streaming quality, and post-production flexibility. Modern interview workflows favor a balance between fidelity and bandwidth.
- Audio format - Use
AACorMP3for universal compatibility, butWAVremains the gold standard for lossless editing. VoiceRecorder supports all three, letting you choose based on downstream needs. - Bitrate range - For spoken word, 128 kbps provides clear detail while keeping files manageable. If you plan extensive post-processing or expect listeners on high-resolution platforms, bump to 192 kbps.
- Sample rate - 44.1 kHz is sufficient for voice; 48 kHz only adds unnecessary data unless you’re syncing with video.
When you set the audio bitrate for podcasts, remember that higher rates increase storage consumption. Use VoiceRecorder’s storage management recordings view to monitor space and delete drafts you no longer need.
Utilize built-in noise reduction and wind filters
Even in a quiet studio, ambient sounds-air-conditioning hum, street traffic, or a rustling notebook-can bleed into the recording. VoiceRecorder includes a real-time monitoring voice recorder mode with optional noise reduction filter and wind filter.
- Activate the filter before you hit record; it works on the fly and saves you from a noisy cleanup later.
- Select “Low-frequency roll-off” for wind; this attenuates rumble without affecting vocal range.
- Fine-tune the reduction level - a moderate setting removes most background hiss while preserving natural timbre.
- Test with a handheld fan - if the voice stays clear, the filter is correctly calibrated.
Note: The filter is most effective when the microphone is positioned close to the speaker’s mouth, ideally 2-3 inches away, and when you use a pop shield.
Set optimal recording levels and monitor in real time
Consistent recording level meters are the safety net that prevents clipping and ensures every word is captured at the right amplitude. VoiceRecorder’s real-time monitoring lets you watch these levels as you speak.
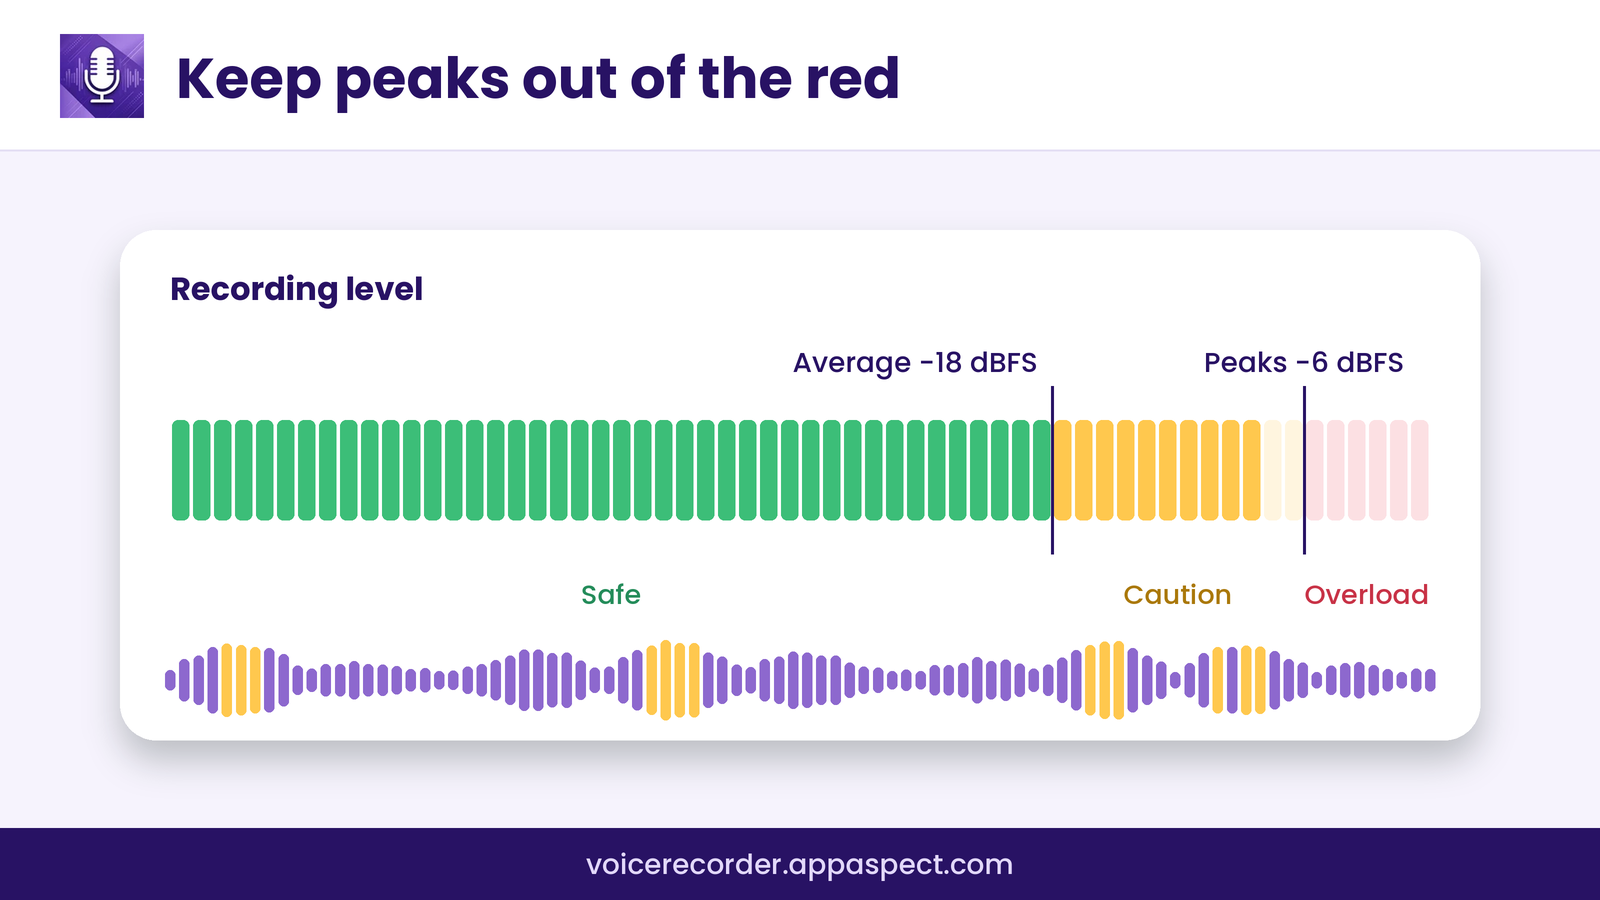
- Target level - Aim for an average of -18 dBFS with peaks no higher than -6 dBFS.
- Dynamic range - Keep the difference between the quietest and loudest parts within 12 dB to avoid listener fatigue.
- Use visual cues - The app displays a green zone for safe levels, yellow for caution, and red for overload. Adjust gain or ask speakers to soften loud bursts when the meter flashes red.
- Enable “auto-gain” only if you have unpredictable speaker distances; otherwise manual control yields more predictable results.
For remote interviews, ask your guest to enable the same monitoring on their device. This shared visual reference reduces the need for post-interview level correction.
FAQs
How do I reduce background noise in VoiceRecorder?
Enable the built-in noise reduction filter and position the microphone away from noise sources. Record in a room with soft furnishings to naturally dampen reflections, and keep the gain low enough to avoid amplifying ambient sounds.
What bitrate is best for interview recordings?
A bitrate of 128 kbps in AAC or MP3 offers clear speech quality while keeping file size modest. For projects that require extensive editing or high-resolution playback, increase to 192 kbps.
Can I use an external microphone with VoiceRecorder?
Yes. VoiceRecorder works with any external mic voice recorder that connects via the device’s audio jack or USB-C port. Ensure the mic is recognized in the system settings, then select it as the input source within the app.
How to set proper gain levels on a smartphone recorder?
Start with a low gain setting (around 30 %), record a test phrase, and watch the recording level meter. Increase gain in small steps until peaks sit in the yellow zone without hitting red. Repeat the test after any environmental change.
What export format preserves interview quality?
Export as WAV for lossless preservation; this format retains every nuance captured during the interview. If you need a smaller file for distribution, choose AAC at 128 kbps, which balances quality and size.
Key Takeaways
- Set microphone gain low, then raise it until the level meter stays in the yellow zone.
- Choose
AACorMP3at 128 kbps for most interviews; useWAVfor lossless editing. - Activate VoiceRecorder’s noise reduction and wind filters before recording.
- Keep average levels around -18 dBFS and peaks below -6 dBFS with real-time monitoring.
- Use an external mic for the cleanest signal, and always test gain on each device.
Conclusion
Optimizing voice recorder settings transforms a basic smartphone capture into interview audio that rivals a dedicated studio. By mastering gain, bitrate, noise filters, and real-time monitoring, podcasters and interviewers can deliver crisp, engaging conversations without costly equipment. Apply these steps before every session, and your listeners will hear the difference instantly.
Call to Action with Optimize Voice Recorder Settings
Ready to try these techniques with a tool built for podcasters? VoiceRecorder lets you fine-tune gain, apply noise reduction, and export in high-quality formats-all from your mobile device. Start Using VoiceRecorder today and hear your interviews sound their best. https://voicerecorder.appaspect.com/
Further Reading
- Audio bitrate - Wikipedia - Overview of bitrate concepts and their impact on audio quality.
- Microphone techniques - Wikipedia - Best practices for mic placement and gain control.
- Digital audio recording - Wikipedia - Fundamentals of digital audio formats and sample rates.
- Noise reduction - Wikipedia - How noise reduction algorithms work in recording software.